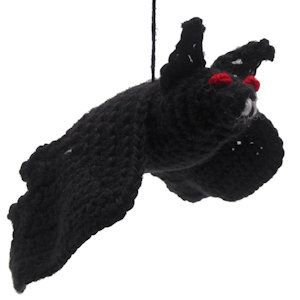
Crochet Little Vampire Bat
If you're looking to add some spooky cuteness to your crochet collection, consider making a crochet little vampire bat! This charming project is perfect for Halloween decorations or for anyone who loves a touch of whimsy in their crafts. With its adorable wings, tiny fangs, and big eyes, this little bat is sure to bring a smile to your face. Crocheting this project can be a fun challenge for experienced crocheters or a great way for beginners to learn new stitches. So grab your yarn and hook, and get ready to bring a little bit of batty charm into your life!
Materials Needed
Caron Simply Soft in Black or Worsted weight acrylic yarn
Polyester Fiber Fill, enough to stuff a fist sized ball tightly
8" piece white sport weight acrylic yarn
8" piece red sport weight acrylic yarn
Size H/8 or 6mm aluminum crochet hook
4 crochet stitch markers
Yarn needle for weaving in ends and sewing on wings, ears and facial features
Yarn Thickness: 3mm
Gauge: 4sc=1" 5sc rows=1"
Finished Size: 10" x 5"
Skill Level: Intermediate to Advanced
NOTE: This pattern is done differently than I normally design a pattern. The body of the bat is done in a continuous round as in tapestry crochet. You will need to mark the very first stitch and move the marker up in each round as you go marking the first stitch in each round so you will always know where the round begins. There is also a second marker that is used to mark an important point in each round. The shorter section between the 2 markers should be 4 stitches wide for most of the body. This is the underside of the bats body, it will be kind of flat.
InstructionsBody
RND 1: Ch 2. 6sc in 2nd ch from hook. Place a marker on the very first sc and move it up as you go, keeping it in the first stitch of each round.
RND 2 & 3: Sc in each sc around.
RND 4: 2sc in each sc around.
RND 5: 2sc in each of the next 8 sc. Place a marker in the last sc just made. Sc in each of the next 4 sc. (20sc) Move the marker up as you go on this corresponding stitch.
RND 6: Sc in each sc around.
RND 7: Sc in next sc, skip next sc, 6 times. Sc in each of the next 6 sc.
RND 8: Sc in each sc around.
RND 9: 2Sc in next sc, sc in next sc 4 times. Sc in each of the next 5 sc. (17 sc)
RND 10: 2sc in each of the next 2 sc. Sc in each of the next 9 sc. 2sc in each of the next 2 sc. Sc in each of the next 4 sc. Do not move the markers from this round.
RND 11-20: Add 2 new markers to this round and move them up as you go so you can count your rounds up to round 20. Sc in each sc around. At the end of round 20, remove the first 2 markers and keep using the 2nd 2 markers until you are done with the body.
Now you are going to start decreasing to shape the bottom of the body. You will end up with 8 stitches around.
RND 21: Sc in each of the next 3sc. Skip 1 sc. Sc in each of the next 2 sc, skip 1 sc, twice. Sc in each of the next 3 sc. Skip next sc. Sc in each of the next 5 sc.
RND 22: Sc in each of the next 3 sc. Skip 1 sc. Sc in each of the next 2 sc, skip 1 sc, three times. Sc in each of the last 2 sc. (11sc)
RND 23: Sc in next sc. Skip next sc. Sc in each of the next 3 sc, skip next sc, twice. Sc in enxt sc. (8sc) Fasten off leaving an end about 8" long for sewing bottom of bat body closed.
Finishing Body: Stuff the body lightly paying attention to making sure the snout gets stuffed well. To stitch the body closed, flatten the bottom so you have 2 layers of 4 stitches across on the top and bottom. Sew this «seam» closed to form a flat-straight bottom. Set the body aside for now.
Bat's Wings
Note about wings: There are 2 types of decreases in the center of the wings you need to know about. One is just that you need to skip one stitch and the other is where you are going to crochet 2 stitches together in one sc. The way to do this is to insert hook in next stitch, yo, pull up a a loop, insert hook in next stitch, yo pull through all 3 loops on hook. This will be referred to as work 1sc over the next 2 stitches.
ROW 1: Ch19. Sc in 2nd ch from hook and in the next ch. 3sc in next ch. Sc in each of the next 5 chs. 1sc over the next 2 chs. Sc in each of the next 5 chs. 3sc in next ch. Sc in each of the next 2 chs. Ch1, turn.
ROW 2: Sc in each of the first 3 sc. 3sc in next sc. Sc in each of the next 6 sc. Skip next sc. Sc in each of the next 6 sc. 3sc in next sc. Sc in each of the last 3 sc. Ch1, turn.
ROW 3: 2sc in first sc. Sc in each of the next 3sc. 3sc in next sc. Sc in each of the next 6 sc. 1sc over the next 2 sc. Sc in each of the next 6 sc. 3sc in next sc. Sc in each of the next 3 sc. 2sc in last sc. Ch1, turn.
There is no decrease in the center of the next 3 rows.
ROW 4: 2sc in first sc. Sc in each of the next 5 sc. 3sc in next sc. Sc in each of the next 15sc. 3sc in next sc. Sc in each of the next 5sc. 2sc in last sc. Ch1, turn.
ROW 5: 2sc in first sc. Sc in each of the next 7sc. 3sc in next sc. Sc in each of the next 17sc. 3sc in next sc. Sc in each of the next 7sc. 2sc in last sc. Ch1, turn.
ROW 6: 2sc in first sc. Sc in each of the next 9sc. 3sc in next sc. Sc in each of the next 19sc. 3sc in next sc. Sc in each of the next 9sc. 2sc in last sc. Ch1, turn.
ROW 7: 2sc in first sc. Sc in each of the next 11sc. 3sc in next sc. Sc in each of the next 10sc. Skip 1 sc. Sc in each of the next 10 sc. 3sc in next sc. Sc in each of the next 11sc. 2sc in last sc. Ch1, turn.
ROW 8: 2sc in first sc. Sc in each of the next 13sc. 3sc in next sc. Sc in each of the next 10sc. 1sc over the next 2 sc. Sc in each of the next 10 sc. 3sc in next sc. Sc in each of the next 13sc. 2sc in last sc. Ch1, turn.
ROW 9: 2sc in first sc. Sc in each of the next 15sc. 3sc in next sc. Sc in each of the next 11sc. Skip 1 sc. Sc in each of the next 11 sc. 3sc in next sc. Sc in each of the next 15sc. 2sc in last sc. Ch1, turn.
ROW 10: 2sc in first sc. Sc in each of the next 17sc. 3sc in next sc. Sc in each of the next 11sc. 1sc over the next 2 sc. Sc in each of the next 11 sc. 3sc in next sc. Sc in each of the next 17sc. 2sc in last sc. Ch1, do not turn.
Now you will work across the bottom of the wings.
Special Stitch Used: Picot. Ch3, slip stitch in 3rd ch from hook.
There are 10 rows and you are going to place your stitches at the end of these rows.
2dc, picot, 2dc in end of row 10. Sc in end of row 8. Dc, picot, dc in end of row 6. Sc in end of row 4. Dc, picot, dc in the end of row 2. Sc in end of row 1.
Now continue working on the bottom of the stitches of row 1.
Sc in each of the first 2 sts. Sc in next sp where 3 sc were made. Sc in each of the next 5 sts. 2sc, picot, 1sc in next st which is the bottom center of the wings. Sc in each of the next 5 sts. Sc in next sp were 3 sc were made. Sc in each of the next 2 sts. Sc in next corner st on end of row 1.
Now work up the other ends of the rows. 2dc, picot, 2dc in end of row 2. Sc in end of row 4. Dc, picot, dc in end of row 6. Sc in end of row 8. Dc, picot, dc in the end of row 10. Sc in corner st row 10 Fasten off and weave ends into back of work.
Final Assembly
Step 1: Make 2 ears the same. Ch7, slip stitch in 3rd ch from hook, sc in next ch. Skip 2 chs. 3dc in last chain. Fasten off leaving an 8" piece. Weave the other end in and using the 8" end stitch ears to top of head.
Step 2: Embroider eyes and fangs to front of face. I used French knots for the eyes and just straight stitches for the fangs.
Step 3: With a long piece of black yarn, sew the wings down the center of the body back along the center of the wings. Attach hanger of some sort to back of bat. I used the same yarn I used to make the bat for the hanger.