Crochet Beaded Sunburst Glass Cover
The Crochet Beaded Sunburst Glass Cover is a charming and unique accessory that adds a touch of elegance to any table setting. With its intricate crochet design and sparkling beads, this cover not only protects glassware but also transforms it into a beautiful centerpiece. Crafted with care and attention to detail, it is sure to impress guests and make any occasion feel special. Whether you're hosting a dinner party or simply enjoying a cup of tea, this lovely cover is a delightful addition that brings warmth and style to your home decor.

Materials Needed
Size 10 crochet cotton in ecru
Size 7 steel crochet hook
18 2" gold tone head pins
36 4mm clear glass beads of desired color
18 each of 3 or 4 different types of beads of desired colors and choice
Tapestry Needle for weaving in ends
Pair of round nose jewelers pliers
Yarn Thickness: 10thread
Gauge: 8sc =1"
Finished Size: 8" diam
Skill Level: Beginner
Instructions
RND 1: Ch5. Join w/slst to first ch to form ring. Ch4, 23 tr in ring. Join w/slst to top of ch4.
RND 2: Ch4, tr in same st as slst. 2tr in each tr around. Join w/slst to top of ch4. (48 tr)
RND 3: Ch4. 2tr in next tr. *Tr in in next tr. 2tr in next tr. Rep from * around. Join w/slst to top of ch4. (72 tr)
RND 4: Ch1. Sk next tr. 5dc in next tr. Sk next tr. *Sc in next tr. Sk next tr. 5dc in next tr. Sk next tr. Rep from * around. Join w/slst to ch1.
RND 5: Ch3, 2dc, ch2, 3dc in same st as slst. Sk 2 dc. Sc in next dc. Sk 2 dc. *3dc in next sc, ch2, 3dc in next sc. Sk next 2 dc. Sc in next dc. Sk next 2 dc. Rep from * around. Join w/slst to top of ch3.
RND 6: Slst into each of the next 2 dc. Slst into the next ch2 sp. Ch3, 2dc, ch2, 3dc in same sp. Tr in next sc. *3dc, ch2, 3dc in next ch2 sp. Tr in next sc. Rep from * around. Join w/slst to top of ch3.
RND 7: Slst into each of the next 2 dc. Slst into the next ch2 sp. Ch3, 2dc, ch2, 3dc in same sp. Tr, ch1, tr in next tr. *3dc, ch2, 3dc in next ch2 sp. Tr, ch1, tr in next tr. Rep from * around. Join w/slst to top of ch3.
RND 8: Slst into each of the next 2 dc. Slst into the next ch2 sp. Ch3, 2dc, ch2, 3dc in same sp. Tr, ch1, tr in next ch1 sp. *3dc, ch2, 3dc in next ch2 sp. Tr, ch1, tr in next ch1 sp. Rep from * around. Join w/slst to top of ch3.
RND 9: Slst into each of the next 2 dc. Slst into the next ch2 sp. Ch3, 2dc, ch2, 3dc in same sp. (Ch3. Sc in next ch1 sp. Ch3.) *3dc, ch2, 3dc in next ch2 sp. Rep bet ()once. Rep from * around. Join w/slst to top of ch3.
RND 10: Slst into each of the next 2 dc. Slst into the next ch2 sp. Ch3, 2dc, ch2, 3dc in same sp. (Ch3, sc in next ch3 sp twice. Ch3.) *3dc, ch2, 3dc in next ch2 sp. Rep bet () once Rep from * around. Join w/slst to top of ch3.
RND 11: Slst into each of the next 2 dc. Slst into the next ch2 sp. Ch3, 2dc, ch2, 3dc in same sp. (Ch5. Sk next ch3 sp. Sc in next ch3 sp. Ch5. Sk next ch3 sp.) *3dc, ch2, 3dc in next ch2 sp. Rep bet () once. Rep from * around. Join w/slst to top of ch3. Fasten off and weave ends into back of work. You can iron and use it as a doily at this point or continue on to make it the glass cover.
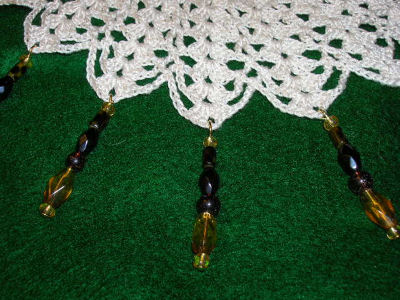
Finishing: Assemble the beads into bead drops in any way you wish by putting the beads on each of the 18 head pins. Leave a .5" length of pin at the end to make into a loop. Attach them to the ch2 spaces on round 11 of doily. You will need to use the pliers to make the loops and close the loops when you put the beaded pins onto the doily.