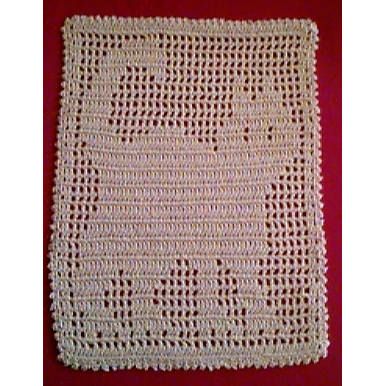
Crochet Filet Cat Doily
Hey there! Crocheting a Filet Cat Doily can be a purr-fectly delightful project for any cat lover! This charming doily typically features intricate filet crochet patterns of cute cats — adding a touch of whimsy and charm to any room. Whether you're a seasoned crocheter or just starting out, creating a Crochet Filet Cat Doily can be a fun and rewarding way to add a cozy touch to your home decor. With its adorable design and the satisfaction of handmade craftsmanship, this sweet doily is sure to bring a smile to your face every time you see it. Happy crocheting!
Materials Needed:
Size 10 cotton crochet thread in ecru or color of choice.
Southmaid was used in the example.
Size 7 steel crochet hook
tapestry needle
Stitch chart.
Spray Starch, piece of muslin 10«x12» in size
Iron
Yarn Thickness: 10thread
Finished Size: 7«x9½»"
Gauge: 10 dc=1" 4 rows=1"
Skill Level: Intermediate
This is the icon used to make this pattern's chart.
Special st instructions: Work the fol when you come across the abbreviation of «pic» This is a picot.
Picot: pic Ch3, slst in 3rd ch from hook.
Instructions
Ch 67, Dc in 3rd ch from hook and in each ch across. You should now have 65 dc including the 3chs at the beg of the row. You have just completed row 1, the very bottom of the chart. Now starting on the right, work row two. Work row 3 from left to right and every odd numbered row as well.
In other words:
What I meant is when you are finished with row one, you will be reading the rows in this manner. All even numbered rows from right to left and All odd numbered rows from left to right. So you are crocheting back and forth as you normally would but reading the chart as mentioned above. Work 1 dc for each bar and each space bet bars. Ch 1 where there are spaces and skip one st to make mesh. The spaces where there is a little symbol is where you will «fill» in the mesh with one dc.
Chart For Filet Cat Doily
After crocheting all of the rows in the chart, work the following around the perimeter of the doily.
Left Side: At the very last st, ch 1, start woriking down the left side of the doily working in each row. (sc, pic, sc in next row.) repeat bet ( ) all the way down the left side.
Bottom:
Work the the fol in the corner, (sc in corner sp, pic, sc in same corner sp.)
Work the following across the bottom. sc in next st, *pic, sk 1 st, sc in next st rep from * across. When you come to the next corner, sc, pic, sc in same corner sp.
Right Side: Rep as for left side but work up the side to the next corner and rep as for previous corners.
Top: Rep as for bottom. Work the corner as before. Slst to first sc. Fasten off and weave ends into work. Starch lightly to block with hot iron and muslin.