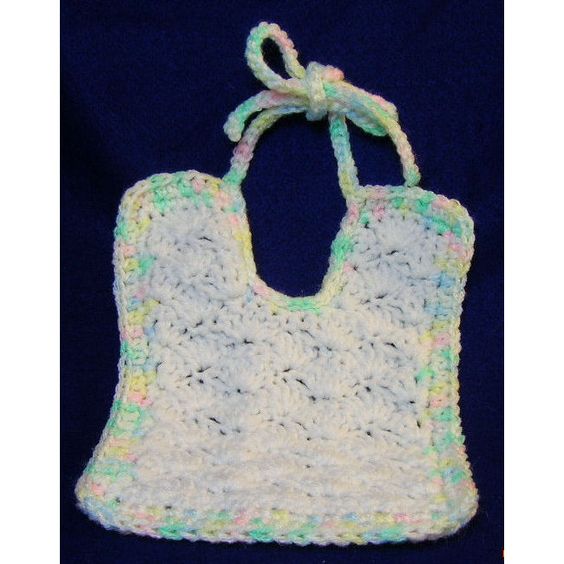
Crochet Shell Stitch Baby Bib
Crochet Shell Stitch Baby Bibs are the perfect handmade touch for your little one's mealtime adventures. The beautiful shell stitch design adds a whimsical and charming flair to these bibs, making them not only practical but also adorable. Crafting these bibs can be a fun and rewarding project, allowing you to put your creativity and skills to use while creating something functional for your baby. The shell stitch pattern creates a textured and eye-catching look that sets these bibs apart from the typical plain ones you find in stores. Your little munchkin will surely look extra cute wearing a homemade bib that is made with love and care. So, grab your crochet hook and some soft yarn, and get ready to stitch up some adorable and useful baby bibs that will make mealtimes even more delightful!
Materials Needed
Worsted weight acrylic yarn in white*
Worsted weight acrylic yarn in Baby Print*
Size H/8 or 5mm aluminum crochet hook
Yarn needle for weaving in ends
Yarn Thickness: 4mm
Gauge: 4dc=1"
Finished Size: 7" by 10"
Skill Level: Intermediate
Special Stitch Used: Shell Stitch. (sh) Work 5 dc in same st as indicated.
Instructions
ROW 1: With white. Ch20. Sc in 2nd ch from hook and in each ch across. (19sc)
ROW 2: Sc in first sc. Sk 2 sc. 5dc in next sc, sk 2 sc, sc in next sc, 3 times. Ch3, turn.
ROW 3: 2dc in top of sc. Sk 2 dc. Sc in next dc, sk 2 dc, 5dc in next sc, sk 2 dc, twice. Sc in next dc. Sk 2dc. 3dc in last sc. Ch1, turn.
ROW 4: Sc in first dc. Sk 2 dc. 5dc in next sc, sk 2 dc, sc in next
dc, sk 2 dc, 3 times. Sc in top of ch3. Ch3, turn.
ROW 5: Repeat ROW 3.
ROW 6: Repeat ROW 4.
ROW 7: Repeat ROW 3.
ROW 8: Repeat ROW 4.
ROW 9: Repeat ROW 3.
ROW 10: Repeat ROW 4.
ROW 11: Repeat ROW 3.
Shoulders: Right
ROW 12: Sc in first dc. Sk 2 dc. 5dc in next sc. Sk 2 dc. Sc in next dc. Ch3, turn.
ROW 13: 2dc in top of sc. Sk 2dc. Sc in next dc. Sk 2dc. 3dc in next sc. Ch1, turn.
ROW 14: Repeat ROW 12.
ROW 15: Repeat ROW 13.
ROW 16: Repeat ROW 12. Fasten off.
Left Shoulder
Place bib in front of you so the shoulder you just completed is on the upper right. Join yarn in 3rd dc of the next 5dc shell.
ROW 12: Ch1, sc in same st. 5dc in next sc. Sk 2 dc. Sc in top of ch3. Ch3, turn.
ROW 13: Repeat ROW 13 of Right side.
ROW 14: Repeat ROW 12 of Right side.
ROW 15: Repeat ROW 13 of right side.
ROW 16: Repeat ROW 12 of right side. Fasten off. Weave ends in.
Perimeter and ties.
RND 1: Join baby print in upper left shoulder on first sc on the right. Sc in each st to the corner. 3sc in corner. (Work 2 sc in each row that ended in a dc or ch3. Work 1 sc in each row that ended with a sc.) Work 3 sc in bottom left corner. Work 1 sc in each st across bottom. Work 3 sc in bottom right corner. Repeat bet () up right side of bib. Work 3 sc in top right corner. Work 1 sc in each st across right shoulder. Work 3 sc in next corner. Work bet () down the inside collar of right shoulder, 1 sc across the lower part of the neck on ROW 11. Repeat bet () up the right side of the left shoulder to where you joined the baby print. Join w/slst to first sc. The ties are worked into this 2nd round as you go.
RND 2: Ch2, hdc in each st across the upper left shoulder, down the left side, across the bottom, up the right side and across the right shoulder, but work 3hdc in each corner st. Do not continue in the neck area. Ch50. Slst in 2nd ch from hook and in each ch back to the shoulder. Slst in each st around the neck to the other shoulder, ch50, slst in 2nd ch from hook and in each ch back to the shoulder. Slst in top of ch2. Fasten off and weave ends into back of work.
*I bought a total of 15 oz of the Baby print and 14 oz of the white because I plan to design a baby rattle, and baby afghan to match. If I have enough after that, I plan to design baby booties as well.