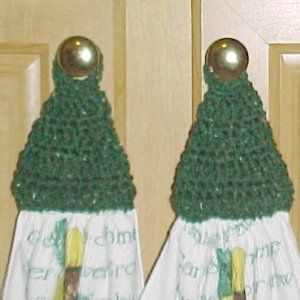
Crochet Cone Towel Topper
Crochet cone towel toppers are a delightful addition to any kitchen, adding a touch of cozy charm while also being practical. These handy creations make it easy to hang your kitchen towels anywhere you need them, such as on oven handles or cabinet knobs. The beauty of crochet cone towel toppers is that they are customizable to fit your style and color preferences, making them a fun and creative project to work on. Whether you're a crochet enthusiast or a beginner looking for a simple yet rewarding project, crafting a crochet cone towel topper is a great way to add a personal touch to your kitchen decor. So grab your crochet hook and yarn, and let's get crafting to add some handmade warmth to your kitchen!
Materials Needed
Worsted weight acrylic yarn in a color to match towel.
1 Kitchen hand towel cut in half.
Size H/8 aluminum crochet hook
Sharp yarn needle
Yarn Thickness: 4mm
Gauge: 4dc = 1"
Finished Size: 3«x5»
Skill Level: Beginner
Instructions
STEP 1: Use yarn and sharp needle to gather up the cut edge of the towel. Gather it up as tight as you can so you have about a 2" section at the top. Set aside.
RND 1: Ch24. Being careful not to twist chain, join w/slst to first ch to form ring. Ch3. Dc in each ch around. Join w/slst to top of ch3.
RND 2: Ch1. Sc in each dc around. Join w/slst to ch1.
RND 3: Ch3. Dc in each sc around. Join w/slst to top of ch3.
RND 4: Ch1. Sc in each of the next 2 dc. Sk next st. *Sc in each of the next 3 dc. Sk next st. Rep from * 5 times more. Join w/slst to ch1.
RND 5: Ch3. Dc in each sc around. Join w/slst to top of ch3.
RND 6: Ch1. Sc in each of the next 2 dc. Sk 1 st. *Sc in each of the next 3 dc. Sk 1 st. Rep from * around. Join w/slst to ch1.
RND 7: Ch3. Dc in each sc around. Join w/slst to top of ch3.
RND 8: Ch1. Sc in next st. Sk 1 st. *Sc in each of the next 2 sts. Sk 1 st. Rep from * around. Join w/slst to ch1. You will end up with 1 sc at the end of the round. Finishing: Flatten cone so that you line up the top round. Work through inside lps of the last round through the front and back side. Ch1. Sc in each st across. Ch6. Join w/slst to ch1. Turn. Ch1. 12 sc in ch6 sp. Join w/slst to base of hanging lp just made. Fasten off and weave ends into back of work so they look like the picture.